Navigation
Showing posts with label food. Show all posts
07 April 2014
BAREBURGER
You see that beautiful hunk of sexiness right there? That, my friends, is the best burger I have ever had the absolute privilege of tasting.
11 March 2014
FOODPORN = THIS
Prepare your ears...
Sweet potatoes. Stuffed with quinoa. Kale. Sauteed onions. Almonds. And cranberries.
Ladies and gentlemen, if there's one thing better than foodporn, it's this. This is more than just porn. This is true love. With the sexiest food on the planet. I almost feel like I'm taking this too far now, because it's starting to feel a bit weird, but suffice it to say, this was damn good and fairly healthy. And because I love this, and I love the world right now, I'm sharing it with you, person reading this blog post. Enjoy. You can thank me later.
I went off of this recipe I found on Pinterest. Now, the recipe doesn't explain step by step instructions in detail, which for someone like me where the term "amateur" in the kitchen is too high a regard, leaves a lot to be desired.
I'll just say for those who are not as savvy in the kitchen (read: people who need detailed instruction manuals (read: me)), the steps I took to achieve all necessary parts of this meal. Or you could just google each step, like I did, but now I've put it all here for you in one convenient spot!
For the sweet potatoes:
- wash them in the sink and scrub all the dirt off
- dry thoroughly with paper towels
- stab them all over with a fork (if you have any aggression, here's a good chance to take it all out)
- put them on a foil lined baking sheet
- bake at 350 for 1 hour, turning them over at the halfway point
- rinse quinoa in a strainer (obviously one that doesn't have big holes because hello, quinoa is TINY)
- make sure it's somewhat dry-ish, then put in a saucepan with your veggie broth and bring to a boil
- once it's boiling, turn the heat down to low heat so it simmers for about 15-20 minutes (or until the broth is absorbed and the quinoa is light and fluffy
- take off the heat and fluff with a fork
- put a saucepan on the stove at medium-high heat
- once the pan is hot, pour in your olive oil and woosh around (carefully - hot oil hurts like a bitch, or so I've heard)
- put in your onions and consistently move them around or flip them (again, carefully, because hot oil) until soft and starting to golden
- add kale, cranberries, and almonds
- when kale gets a bit darker and softer, add quinoa
- take off heat and mix together (at this point I put it all in a bowl and added a little sliver of butter here rather than cooking the onions with both oil AND butter)
One more look for the road?
OHHHHH YEAH BABY.
09 March 2014
SPAGHETTI SQUASH PIZZA
Who said pizza can't be healthy? Ladies and gentlemen, allow me to present a pizza that is absolutely all veggies and cheese (and a little prosciutto because MEAT). Say hello to the Spaghetti Squash Pizza Crust! I swear to any and all gods, this tastes amazing. Just like a bread-crust pizza, except better because it's vegetables. And also, spaghetti squash is amazing. Allow me to share the recipe...
06 March 2014
BOROUGH MARKET
Heyo, say hi to my sister in the first photo, because this post comes all the way from back in June of last year, when my sister came to visit me in London! Yeah, I know, I suck at keeping up with stuff. That is not new information, and to be honest, it likely won't change anytime soon. It's who I am, so love it or leave it. :p Now, this is going to be a short and sweet post, though I assure you that Borough Market is anything but short and sweet. Okay, it's sweet among other things, but my point is that you could spend all day there, and this post doesn't feel like it does that justice, but that's what I get for posting this about nine months late, sooooo...
30 September 2013
THE BREAKFAST CLUB
Confession: I've never seen the movie. I know, I know... But there are a few of these American-style restaurants around London and one not too far from where I live, so last Sunday (yes, I'm ages behind, I'll get to that later), I went with three friends to get some good ol' 'Murican breakfast.
11 July 2013
LET'S PLAY A LITTLE CATCH UP...
18 June 2013
AFTERNOON TEA
It was delicious, and so wonderfully elegant. When we first sat down, we were asked if we would like champagne, and I said no thank you because I knew it cost more, and she declined as well. But then only a half a minute later, another waiter came and placed a flute of champagne in front of each of us anyway (we accepted it, because why not?). I later found out that the final tea sitting of the day offers a free glass of champagne, so there you go.
The finger sandwiches... something about finger sandwiches is so delightful to me. They're so dainty and I feel so fancy eating them, even though they're not much different than sandwiches a kid would eat in a packed lunch at school. But these were delicious. The tea was very good, and made with loose leaf tea, so you had to put the little strainer over the cup when you poured it. And the desserts were so decadent! But the best part was the scones with clotted cream and jam. If you remember, I took it upon myself earlier this year to make scones as a result of my despair of having left England. Also, I love me some clotted cream. America just doesn't have the same stuff.
10 March 2013
just call me... erm, I dunno, someone on the cooking channel
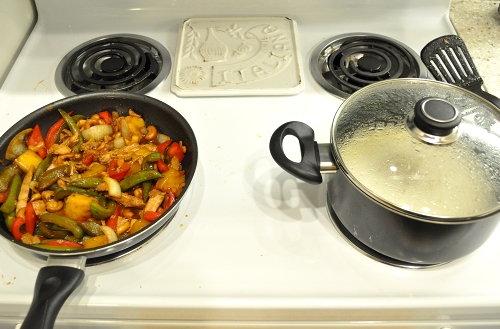
Stir-fry: Stirring, I can do. No problem. I'm an excellent stirrer. Top notch. Frying, however, I was not so sure about. I probably am one of the least skilled people in regards to the kitchen ever. Or I thought I was, but then, mother of all things food, I actually made a stir-fry! And it was delicious!!
Okay.
I cheated a little.
Asked my sister for help over the phone.
But still!
But still!
I'm used to having exact recipes for baking, which I can do because it's so specific. Because cooking is a lot more subjective and experimental, it hasn't been as easy. And I'm not sure how to really write down a "recipe" for this stir-fry because I don't remember exact minutes that I had things on this or that setting, etc. But here's what I can tell you...
Ingredients:
- red and green bell peppers
- yellow onion
- snap peas
- chicken (I used the frozen, pre-grilled strips since I didn't trust myself with raw meat)
- cashews (pre-roasted)
- pineapple
- teriyaki sauce
Basically, it was the veggies in a frying pan with a splash of olive oil over medium heat until the onions started to become translucent, then added chicken, cashews, and pineapple in that order (note that if you're using raw chicken, you should probably put that on first thing even before veggies so it cooks more). Once everything was at the consistency I wanted, I added the teriyaki sauce - about half the average-sized bottle for the amount I made, which was maybe 4 servings. Let it cook for a little more while I started the rice, then once it all looked good, turned it down to a low simmer until the rice was done. I actually took it off the stove before the rice had finished because I didn't want it to get mushy, but use your judgement.
Oh yeah, and don't forget to stir. :p
Put a big old spoonful or two over the rice and BAM. Stir-fry goodness. :)
02 February 2013
a (yummy) taste of England
Over the past week or so, I've had a craving for some clotted cream. I had it in Wales on a scone, and it was so wonderfully scrumptious, I was determined to make it here - scones and all! Well, turns out clotted cream has to sit in the oven for at least 8 hours! Sorry, no can do. But I was able to find some at Whole Foods, so off I went to purchase some clotted cream and ingredients to make scones.
I'm warning you, these scones are so easy and so delicious, there is a large possibility of wanting to make them every few days so you never run out of a breakfast (or dessert ;) ) option.
First things first, preheat your oven to 400 degrees.
It looked like scones are supposed to be made using self-rising flour, but as I'm a poor college student, I made my own version out of all-purpose flour, baking soda, and salt. Start out by mixing together the flour, sugar, baking soda (yes, more baking soda), and salt with a whisk. The trick with scones is you don't want to over-handle them, because we want them to stay light and fluffy, so a lot of the steps require a gentle caressing touch. :)
Cut up your butter into cubes, and drop them into your dry mixture...
... then use your hands to scrunch it all together until you end up with a mixture that looks like a bunch of small crumbs. See below the comparison between our mixture (right) and regular flour (left).
Next, pour your milk and stick it in the microwave for 30 seconds or so - just so it's warm, not hot - then add your vanilla and lemon. Let it sit for a moment while you stick a cookie sheet in the oven to get nice and hot for when you're ready to bake the scones. Turn back to your dry mix and make a little well in the middle, then pour your milk mixture into the middle.
Quickly take a dinner knife and cut and stir through it to get a wet dough. It's going to seem really wet and gooey, but you don't want it very dry, so don't worry about it. :)
Sprinkle your prep surface with some flour and use the knife to tip the dough onto the floured surface. Flour up your hands, pat a little on top of the lump of dough and gently flip it over a couple times - don't knead it, we don't want to manhandle it - and pat it into a lump about and inch and a half high.
Coat your dinner knife in flour and cut through the dough to make four individual scones, flouring the knife between each cut (the dough gets sticky!). Brush some egg beater on the tops of the scones and sprinkle a little cane sugar on top. Take your cookie sheet out of the oven, put your scones on it, and pop it back in.
Leave them in until they're lightly golden on top. Mine took about 20 minutes, but I think it just depends on the oven. When in doubt, go for the old toothpick test, and if the toothpick comes out dry, without any dough sticking to it, they're done!
Pretty, huh? :)
Pretty delicious!
Enjoy with some clotted cream and a jam of your choice for a yummy dessert or a naughty breakfast. ;)
1.5 cups self-raising flour
1/4 tsp salt
1 tsp baking powder
5.75 (just under 6 is fine) tbsp of butter
3 tbsp caster sugar (very fine sugar)
6 oz. milk
1 tsp vanilla extract
squeeze of lemon juice
egg beater (to glaze)
24 January 2013
I have a kitchen now, so naturally the first thing I make in it is grilled cheese.
But not just any old grilled cheese. A gourmet grilled cheese straight from the delicious food stylings of Mara from M Loves M. I saw her recipe for this Gruyere Grilled Cheese with Sauteed Shallots and knew that after an extended period of time in the UK where grilled cheese is not quite the highly regarded staple that it is in America, I had to try this out. So I did, and guess what?
Bombdiggity.
Photo from M Loves M
17 June 2012
if you haven't already tried these
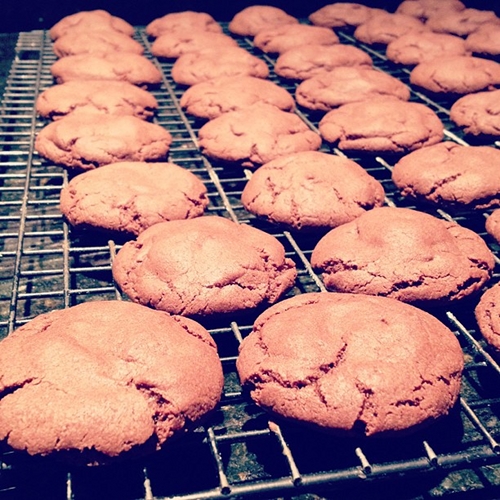
I've been meaning to try out Sydney's Rolo cookies for a while now, and tonight I finally got around to it. Gotta say, I was surprised at how fast and easy it was to make them, and they were delicious.
I mean, really.
Melt in your mouth,
soft and gooey,
dip them in milk,
chocolate caramel goodness,
delicious.
Try this recipe like, now.
Go on, scram!
Then ooh and ahh to your friends so that everyone can be a part of the wonderful scrumptiousness that could probably be used to stop wars and be a currency for the world.
07 June 2012
salted caramel brownies
Okay guys, get ready for extreme deliciousness. My friend and I are obsessed with salted caramel anything {especially when it also has chocolate! I mean, what isn't better with chocolate...} so we decided to bake our own idea of salted caramel brownies.
We kind of cheated by using a Betty Crocker brownie mix, but tweaked it a bit to make it our own.
Starting with the ingredients... we used sea salt and a caramel sauce topping as opposed to caramel flavored syrup, though you could use that if you prefer.
Set the caramel and sea salt aside, and mix all the ingredients just as it says on the back of the brownie box.
Once that's all been mixed, pour half of it into a greased pan...
Then, using a spoon, drizzle as much caramel as you would like onto the mix {we'll add more on top later also, so don't put all of it on there!}. Be aware that the caramel tends to want to glob when you first start to drizzle.
Pour the rest of the brownie batter on top.
Then drizzle some more caramel.
Take a knife and do a one spiral around the pan through all the mix {this isn't necessary, but we did it just to spread it out a bit}.
Looks all pretty and delicious!
Then, sprinkle some sea salt on top! We did as much as is in the picture, and it turned out really well. Noticeable, but not too salty.
Bake at 350° for however long it says for your pan size. Ours was a 9x9 circular pan and we ended up baking it for 43 minutes total. If you do the toothpick test to see if it's done, I would stick it in a couple different places, because the gooey-ness from the caramel might make it seem less done than it actually is.
And there you have it!
A dee-licious recipe for salted caramel brownies.
Enjoy!
22 May 2012
top pot morning
Last night I had a couple friends over with the intention that this morning we would go on an early-ish {9 am is early, right?} morning breakfast trip to Top Pot Doughnuts & Coffee in downtown Seattle. So that's exactly what we did. I chose the old-fashioned glazed, because I love the density of old-fashioned donuts. And Top Pot makes them best!
Another thing I missed about Seattle?
Those places unique to the Pacific Northwest, like Top Pot.
Anyone ever had a Top Pot doughnut before?
What's your favorite kind of doughnut?
Subscribe to:
Posts (Atom)